Advertisements
I think we all want to live the American dream. We want a big house, a yard for our kids and our dogs to run in, and a project that will be the envy of the neighborhood.
Well, Wayne Martin had a house and a yard, and decided to get to work on a large-scale project to really set his home apart from the rest. So naturally, he started digging! While the rest of his neighborhood thought he was nuts, they quickly realized he had an amazing plan for his backyard. It’s pretty crazy what Wayne did with this giant hole, but it’s definitely one of the most ambitious projects we’ve ever seen!
What Are You Going To Do With That Hole?
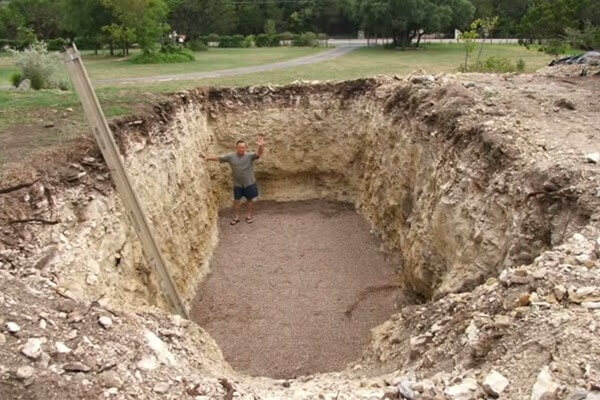
The first thing I would have thought if I came across one of my neighbors digging a hole this size is that they have plans for an in-ground swimming pool. Frankly, even if it was just a giant swimming pool, I think his entire neighborhood would be jealous.
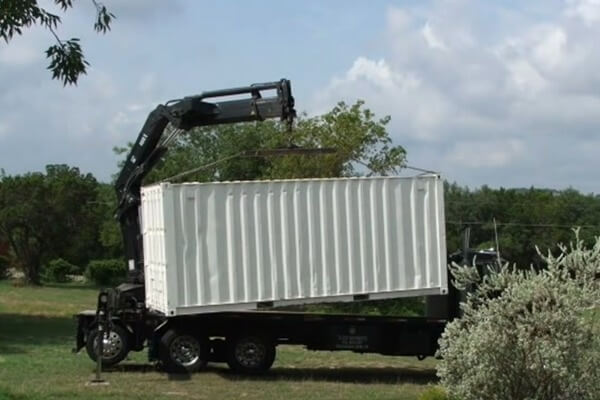
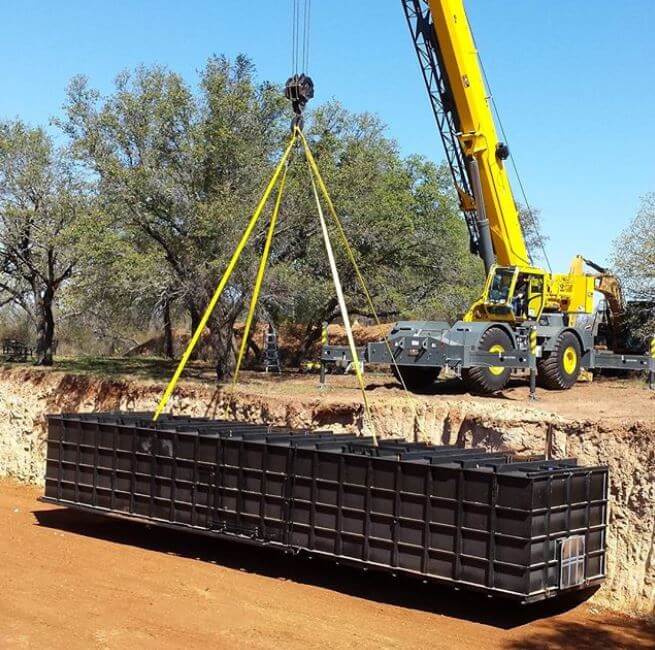
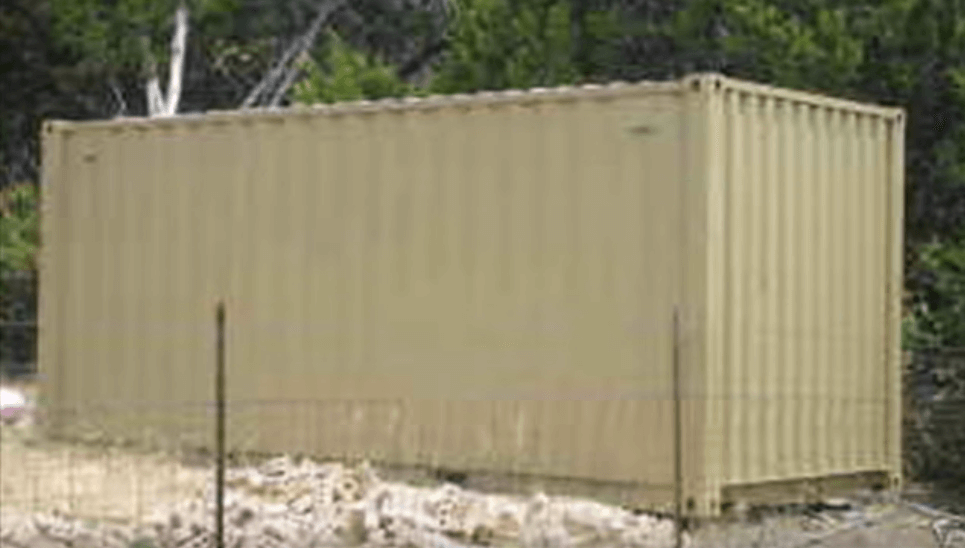
However, Wayne decided to fill that hole with something more than water. After laying down some gravel, he brought in something that definitely doesn’t fit in any pool. Neighbors quickly took notice once Wayne brought a 20-foot shipping container onto his lawn.
Buying A 20-Foot Container
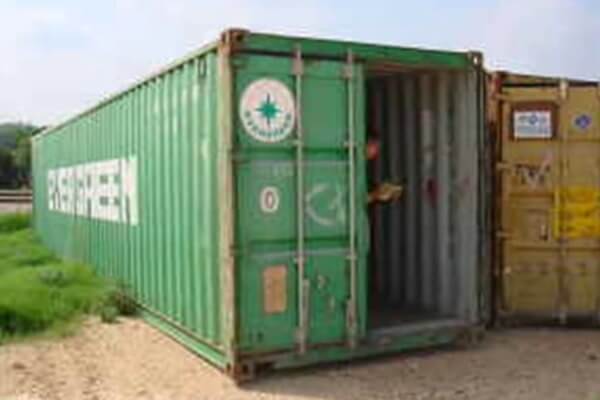
So before Wayne even started digging a hole, he went out and purchased a 20-foot shipping container. It’s pretty surprising how many of these giant containers you can find out on the internet at incredibly affordable prices.
As any DIYer knows, one of the most important things to do is keep costs low. It can be incredibly easy to lose track of your spending and splurge on products you don’t actually need. The fact that Wayne was able to find a container of this size and keep his budget low really helped make his project come together. But what did he need the container for exactly? We’ll find out soon!
Sealing It Up
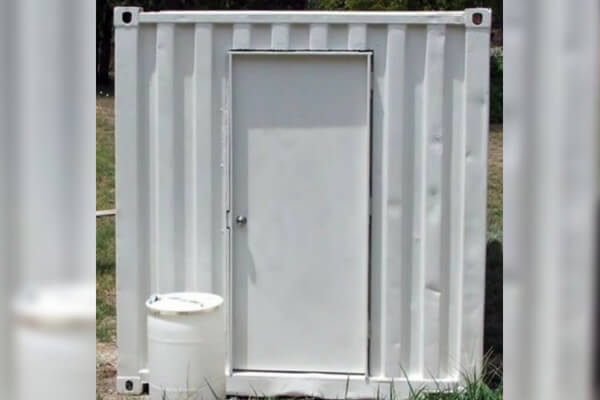
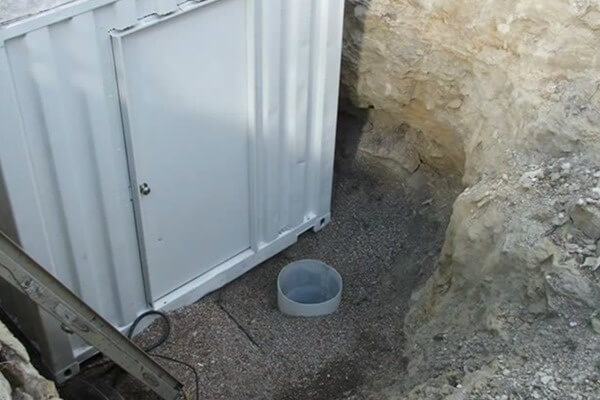
The first step after purchasing his container was making sure to seal it shut. Instead of using the giant double doors, Wayne instead made sure to seal them shut and instead installed a swinging door on the other side.
He didn’t just seal those doors though — he made sure nothing could get in or out, especially leaks. The other important thing he did was made sure that the door he installed swing inward, not outward. He now had a one-way entry point to his container. Trust me — this will make a ton of sense once you see what he did next!
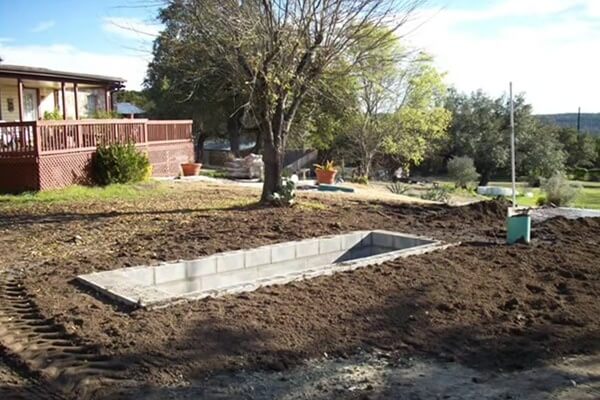
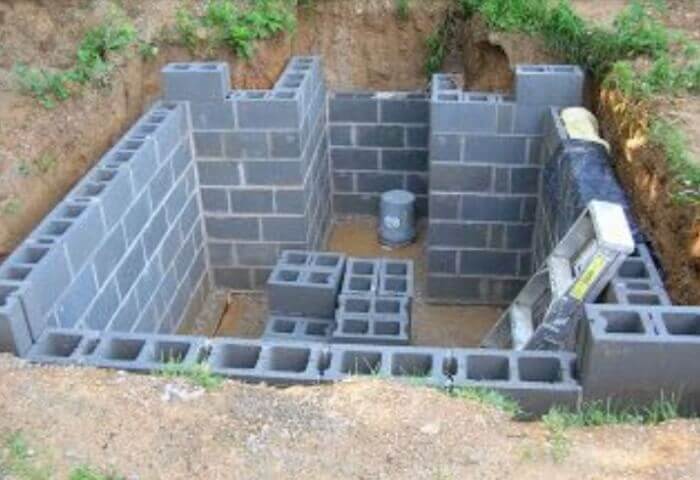
Measure Twice, Dig Once

The biggest mistake Wayne could have made was digging a hole that was too small for his container. So he made sure to make the hole at least two feet deeper than the height of the container.
He also left about two feet of space on all sides of where the container would be placed, and extra room around where the door would swing out.
He Lined the Bottom With Pea Gravel
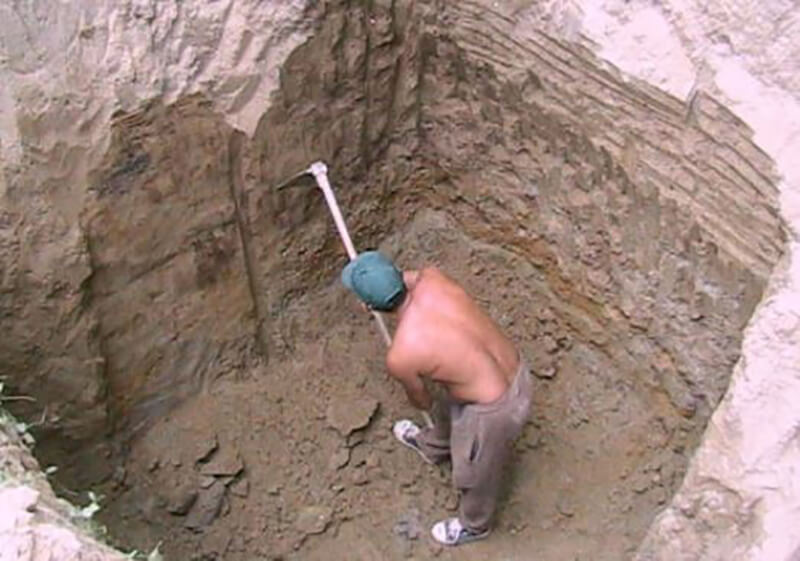
Wayne also lined the bottom with a layer of pea gravel. This was incredibly important because the container needed a soft place to lie on while also being able to filter through to the soil below.
At this point, I think you know what he had planned for the container and the hole, but what was the goal of his project? Well, there’s a reason that he wanted a bit of extra room above the container.
Sometimes You Still Need To Call In A Pro
Even though a lot of this project is meant as a DIY project, sometimes you just have to reach out to a professional. Not everyone has a crane that can pick up a 20-foot container and lower it into a giant hole in their lawn, so Wayne called in a septic tank company to do the dirty work for him.
Honestly, this was a much better idea than trying to round up some friends to try and figure out a way to get the container down there. So the container’s in the hole now, but what is Wayne’s plan? It’s a little more intricate than you might think.
Fits Like A Glove
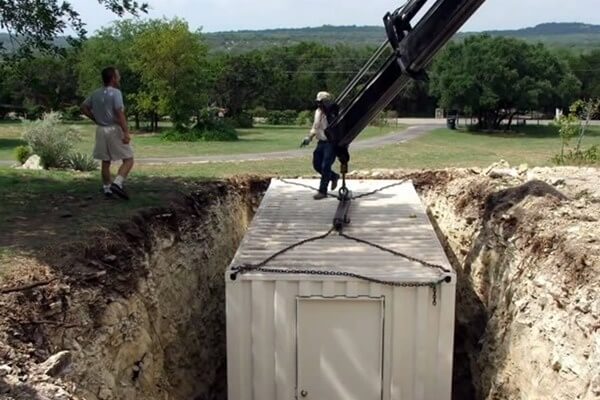
So there are plenty of reasons to make the hole a little bigger than the container, and it’s more than just a little bit of wiggle room. Wayne lefter about two feet of space on each side, as well as a few feet in front of the swinging door.
Now that the container is in the hole, the real project begins. It might seem pretty obvious what Wayne has planned, but I guarantee the finished product will really inspire you to up your DIY game.
Every Bunker Needs A Sump Pump
So a sump pump is a piece of equipment used in plumbing that helps drain water out of enclosed spaces. This is a very crucial piece to the puzzle when you’re putting anything below ground. It allows you to keep your bunker above the water line, so you generally find these in basements.
The last thing you want for your underground bunker is for a flood to ruin anything you put inside it. But what was Wayne planning on putting inside his bunker exactly? The answer to that question is coming up in just a bit.
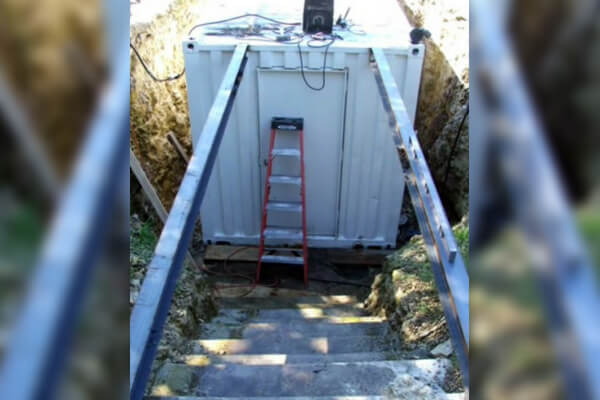
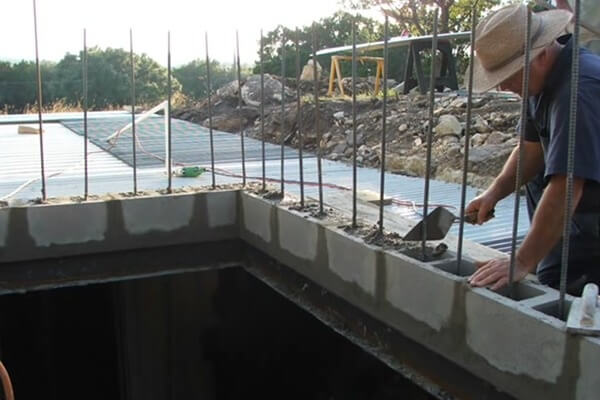
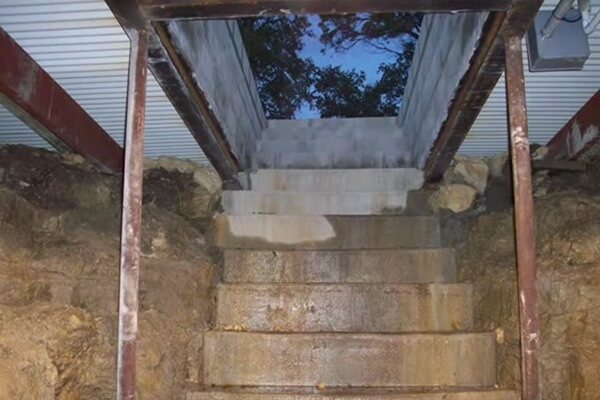
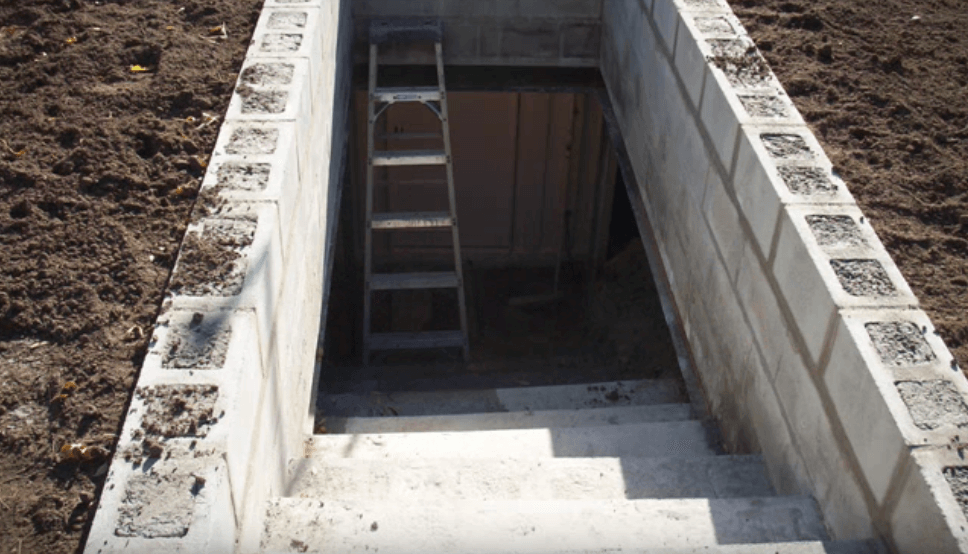
An Entrance Fit For A King
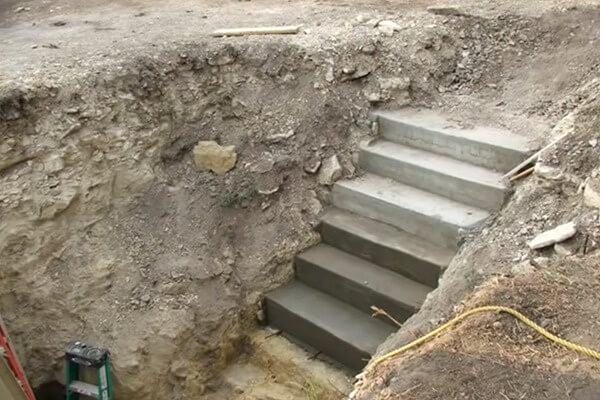
Naturally, when you’re making an underground bunker, you need to have a way to get inside it. Wayne did the logical thing and laid down a set of concrete steps and made sure the top stair was at the same level as the top of his bunker.
I think most people would prefer a simple staircase to something like a ladder or a fire pole to slide down. Now that he had his bunker in the ground and the stairway complete, Wayne could set out on completing the exterior and get ready to outfit the inside.
Everyone Needs A Support Beam
Wayne was very smart to install these two I-beams to ensure his bunker was as stable as possible. You probably wouldn’t think that a giant 20-foot container could move much, but the ground could easily shift and leave his bunker unbalanced.
These two beams actually served another purpose. Not only were they there to provide support for the bunker, but they also acted as a frame for some of Wayne’s other plans for the exterior of his underground bunker. What else does Wayne have planned anyway? You’ll see in just a bit.
Is He Making A Roof?
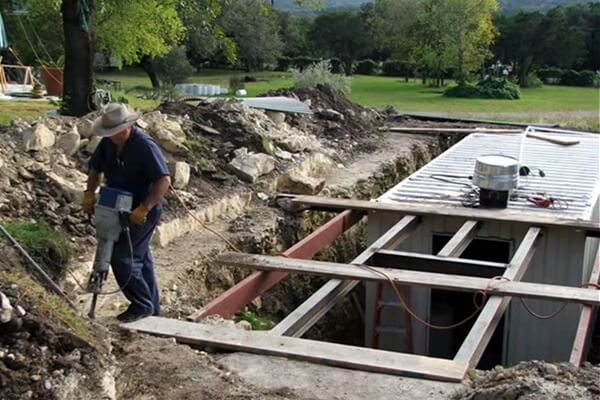
I guess I didn’t consider that when you’re installing an underground bunker, you need to take the necessary precautions to make sure the roof is stable too. Wayne added a tone of framework on top to support a roof, which makes a ton of sense why he added the I-beams in the first place.
This also helps show just what he has in store for the rest of the bunker. I’m glad he made sure to dig that hole a little extra deep because this looks like it’s going to blend in perfectly with the rest of his yard.
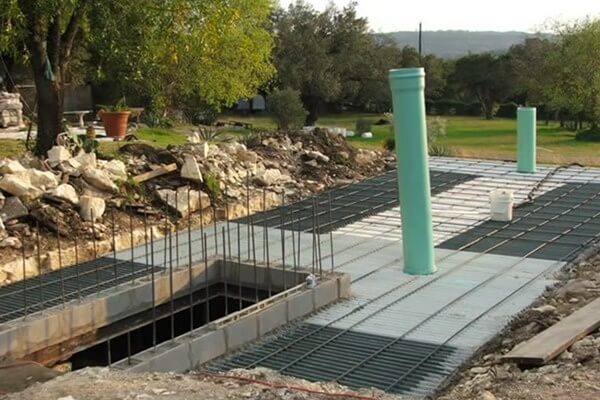
An Underground Roof
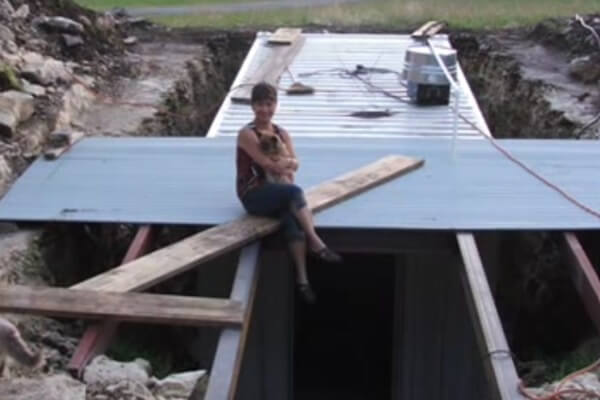
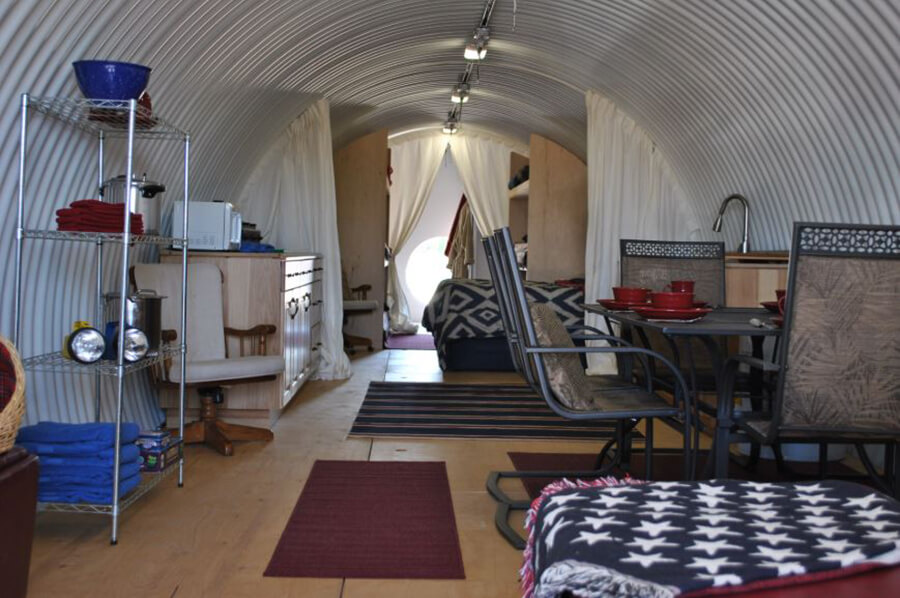
It’s kind of hard to think about a roof being underground, but that’s precisely the plan here. Wayne laid down heavy sheets of metal down across the framework that is stable enough to support a person’s weight… and even a dog!
Obviously, this is just the first steps to laying down the roof, but it gives us a great idea of what they had planned. Now that the exterior was taking shape, we still need to know what’s going on with the inside of the bunker. What’s he planning on putting in there anyway?
More Than Just A Staircase
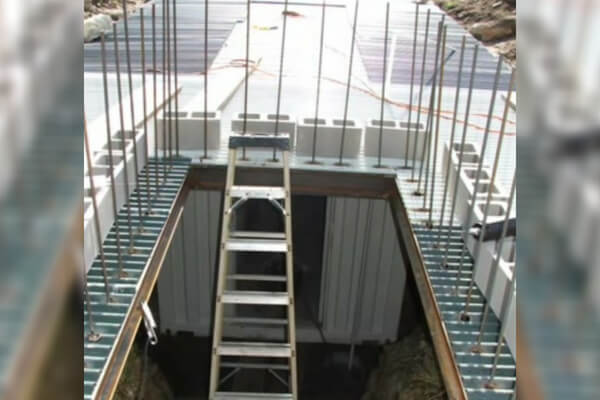
We already shed some light on how the staircase would be the only way in and out of the bunker, but Wayne wasn’t satisfied with just a regular entranceway. Once he had the roof all set up and secure, he got to work making a grand entranceway for his bunker.
He left an opening from the roof and set up some rebar to help keep everything supported. This is such an underrated aspect of his whole project. Why go to the trouble of all of this if you’re going to have a simple entranceway? Go big or go home.
Piling On The Concrete Blocks
Obviously, Wayne took safety very seriously when he was putting together his bunker. Not only did he make sure that his bunker was safe and secure in the ground, but he also made sure that everything was up to code.
This was clearly built to last, and it almost seems like this could work as a makeshift bomb shelter if need be. But is that what Wayne’s been building this whole time, or does he have a different plan for his underground bunker?
Pump That Air In
As crucial as it was to make sure there was a sump pump installed to make sure that water could be filtered through the soil, the most important addition was the air vents. You probably won’t be able to last very long underground without access to fresh air, so Wayne made sure to install two 12-inch air vents in the front and back of the bunker.
This is probably a good indicator that Wayne plans to spend a good amount of time in his bunker, but for what reason? It’s actually way more practical than you might think.
Time To Pour The Concrete

You might have thought that everything was already in place, but Wayne wasn’t taking any chances. The ground can move and shift, especially in the winter when it freezes, so Wayne made sure to encase his bunker in concrete along the sides as well as on top of the roof.
As you can see, this is a perfect pour. Everything looks nice and smooth, and should be able to fit in perfectly with the rest of his yard. You can see how much of his yard has been taken over by this project, but it’s quickly coming together and is all going to be worth it in the end.
Six Inches Of Separation
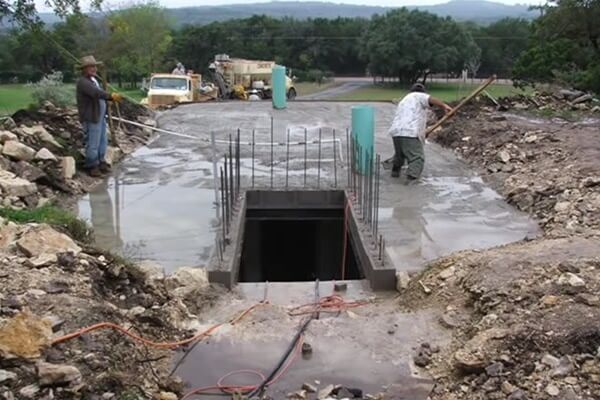
If you thought that Wayne just put a thin layer of concrete over his bunker, you’d be dead wrong. He made sure to put six inches over the top, which is surprisingly thick. It looks like he plans on making his bunker safe and secure, and able to take a beating, whether it be rain, sleet, or snow.
Now that he has his bunker set up to protect against anything life has to throw at it, he can get to work on the interior of the project.
Even More Blocks
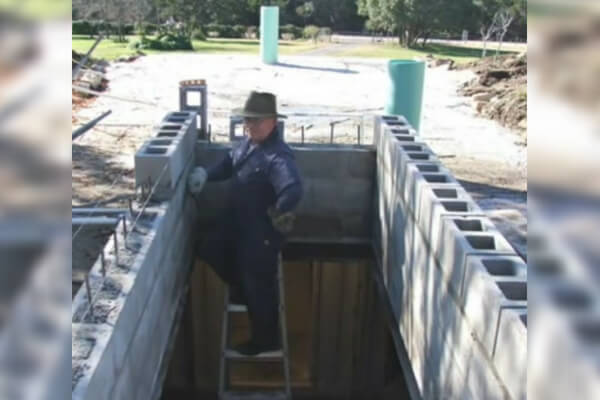
Once all that concrete dried, Wayne went back to basics and added even more cinder blocks through the rebar to his entryway. Clearly, he wanted the entryway to stand out and really be protected.
As the only part of the bunker that would have to deal with the elements, more protection is always better. That door is definitely going to take a beating over the years, so any way you can block out things like poor weather conditions or animals, the better. Now that he’s finally done the outside, we can take a trip down those steps to see what the inside is like!
Removing The Temporary Support Beams
As we’ve said time and time again, when doing a project like this, safety is key. There’s absolutely no reason to cut corners and not take every precaution necessary that your bunker is safe and secure. And when you’re spending this kind of time and money, it just doesn’t pay to take shortcuts.
So once the concrete dried and was stable, Wayne could finally remove the support beams that helped keep the roof secured. All those cinderblocks looked like they were for show, but they all helped provide the foundation for a perfect bunker.
Fill In The Soil Around It
The last thing you want is for you bunker to be sitting out in the middle of your yard in a dirt pit, so Wayne made sure to use some high-end soil to fill the space surrounding the entrance. That means he can go back once everything is done and plant some plants to help it blend in and fit with the rest of his lawn.
You can see that the finished product won’t even make it look like there was a giant hole there in the first place. And I doubt anyone will expect to find a bunker laying underneath.
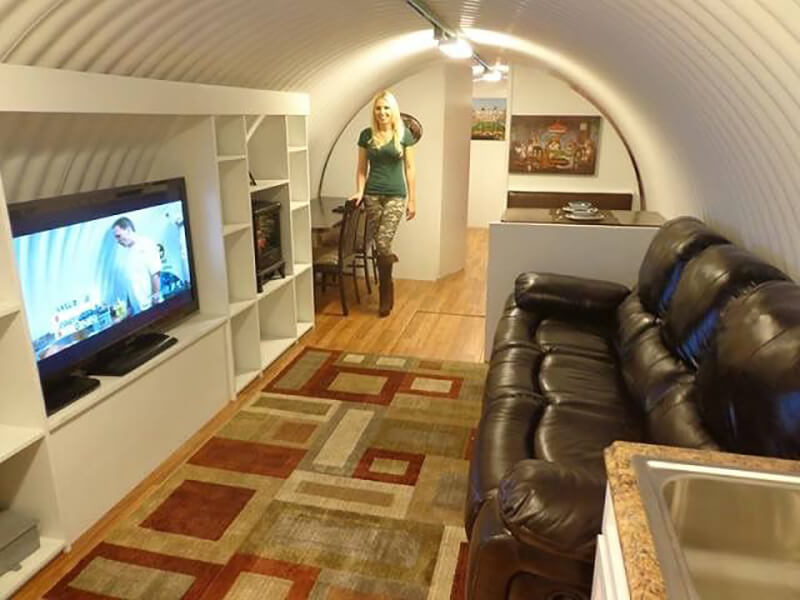
Wait, Is That Wine?

I don’t know what I was expecting, but I don’t think I was expecting this cellar to be filled with wine. However, it makes a lot of sense. Wine is best stored underground, and the cool atmosphere should help it last for generations to come.
But is that the only reason he built this bunker, or does he have even bigger plans for this cellar?
More Than Meets The Eye

The great thing about a container like this is that it can fit so many different needs. As you can see from the back, there is plenty of room for storage, so while he has plans for filling it with wine, it could also be a great place to store your Christmas decorations or non-perishable foods in case of an emergency.
Imagine that something bad like a natural disaster happens? Now Wayne has a shelter built to meet his needs if he needs to hunker down for a couple of hours, or even a couple of days. And the best part is that it doesn’t take up any space in his yard because it’s all underground!
The Plans Are Available to All
One of the most interesting aspects of Wayne’s project is that with a little bit of money and some resources, anyone can do this themselves. Instead of creating his own secret bunker, Wayne decided to share his masterpiece with the world, down to how he created it.
He even shared the specs of his container, noting the aspects that builders will need to pay close attention to if they attempt to recreate it themselves. Wayne even provided some tips he learned along the way.
A Few Tips
While Wayne was finished with his bunker, he did share a couple of tips or recommendations for people who might also try to install their very own bunker. One of his suggestions is adding handrails down to the stairs for security. Frankly, that’s a great idea, especially if you live somewhere cold where those stairs could get icy and slippery.
Also, he said that it might make sense to build a small overhang over the entrance. Again, this would be a great idea if you live somewhere where the elements could leave your stairs icy or even fill the hole with rainwater. Also, it wouldn’t be a bad idea to help keep critters out of your walkway.
He’s Not the Only One to Have This Idea
Although we’re not currently in wartime in America, many people still have bunkers in their homes. During the Cold War the federal government recommended that people create fallout shelters and bunkers in their basement, or buried in their backyard.
They recommended using as much concrete as possible, and a strong roof. During the 1960s, the shelters weren’t designed very well, but now people have more access to information and resources. So how many Americans have bunkers today?
The Bunker Business is Booming
In early 2017, container and bunker building companies saw their business greatly increase. Americans were compelled to prepare for a war-time situation as foreign relations tension and uncertainty of the future grew.
Clyde Scott, who owns Rising Bunkers, a bunker building company based in Texas, said business was at an all-time high in 2016-2017. His sales have increased an incredible 400 percent, according to Independent and have grown to a $10 million a year business.
So what was the total cost of Wayne’s bunker?
What Did This Cost?
In the end, all of Wayne’s hard work came at a price, but it’s way more reasonable than you might think. All in all, Wayne spent $12,500 on his DIY bunker, which is insanely reasonable.
He did say that he did most of the work all by himself, and he did have his own tractor, which likely helped with things like filling in the soil and even digging the hole in the first place. This is one resourceful way to go about creating a bunker. Other people are turning to the emerging bunker companies that will help build one for you.
The Upper Middle Class is Getting Prepared
President and CEO of Utah Shelter Systems, Paul Seyfried says their bunker business has been very busy in recent years. Although his customers are all over the country, Seyfried said the majority are ordered in New York, California, and Texas.
Seyfried told Fox13, “The smallest shelters start at around $50,000. The largest shelters we build, a 12 [foot] by 50 [foot] usually runs right around $100,000.” Most customers are building the bunkers for their families, and are able to deflect electromagnetic pulses and radiation.
See what South Dakota is doing.
Bunkers for Sale in South Dakota
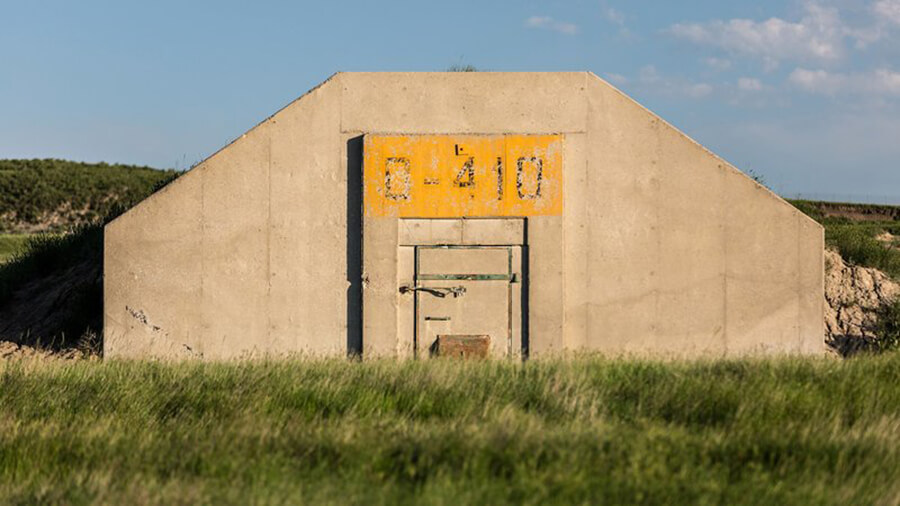
Vivos xPoint is a decommissioned army base located in South Dakota. It hasn’t been used since 1967, but now there are plans to utilize the war-era bunkers once again, this time for citizens. There are an incredible 575 concrete bunkers located “off-the-grid” in the grasslands, near the Wyoming border, and they’re planning on building more.
Bunkers here are available to lease for $25,000 for 99 years, plus $1,000 annually. They’re spacious at 1,590 or 2,120 square feet. However, there’s no plumbing, electricity, or air filtration, so they need some work.
Several Options to Choose From
Atlas Survival Shelters, based in California, said it sold 30 shelters in three days when Donald Trump took office. Compare that to the 10 they sold in the entire year of 2011 and it’s easy to argue that interested has increased.
The bunkers they create are designed to include the comforts of home. So if you’re wanting to take shelter without feeling like you’re hiding in an unfinished basement, this is a good option. Many of their customers are baby boomers who remember the threat of a nuclear or missile attack from when they were younger and want to be prepared.